Showing posts with label ground beef. Show all posts

Wednesday, April 17, 2013

Home Ground Hamburgers with Carmelized Onions


After making my own ground beef from a grassfed beef chuck roast yesterday, I could only do one thing...make hamburgers for supper! There's lots of fancy ways to make burgers, but I opted for simple. Salt and pepper were the only seasonings this flavorful meat needed, although I should have used more salt. But, other than that they were delicious, juicy and tender. Grinding your own beef really results in a more tender burger. Not sure how, but it does. Check out how to grind your own hamburger on my DIY post: Make Your Own Ground Beef Using an Old Fashioned Grinder. 

I topped mine off with cheddar cheese, freshly sliced off the block and caramelized onions, hubby got Swiss cheese, and picky 12 year old daughter got mozzarella. Mister's got cheddar too.  I'm typing this the next morning, and I would love to have a cheeseburger for breakfast right now. They were that good!

Caramelized onions...those are something I am trying to master and I get varying results. One thing I can tell you is that they can go from caramelized to carbonized in the blink of an eye. They are not really something you should try to make while you're doing something else, especially if you have a tendency to be distractible. Not that I don't try to prove that wrong. I should think about making them before whatever I'm going to put them on, but what usually happens is I get some idea for [______] with Caramelized Onions and start making everything. I wonder if I could make a bunch and freeze them in small portions. I think I'll try that.

I cut out an article in the paper years ago about making caramelized onions and it takes forever to do it right. One of these days I'm going to follow those directions instead of doing it my way, I have a feeling they'll turn out better.  Or, I'll try making them in my crock pot, following the recipe I found at food.com, Crockpot Caramelized Onions.  Definitely look through the comments, there's some good tips there. 

How I Make Caramelized Onions, and Sometimes Carbonized...

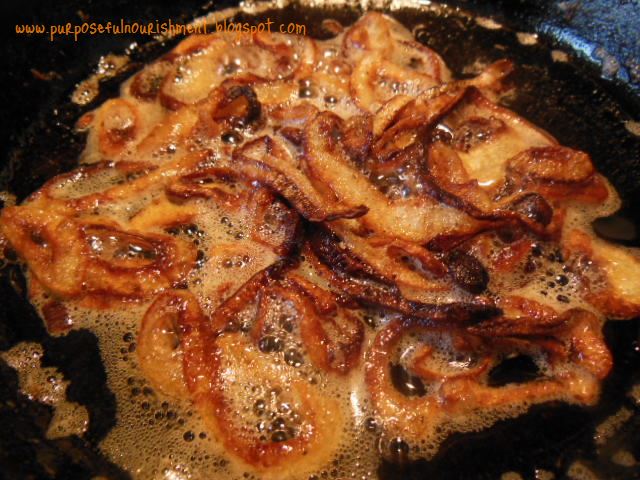
This is one of those "recipes" that is not really a recipe...I cut up some onion (I prefer Vidalia), melt some butter in a hot cast iron skillet, dump in the onions, salt them a bit, and let them cook slowly. Or try to. Seems like I always end up with the pan too hot. But anyway, stir them around to get them coated in the butter, and stir occasionally. When they start to turn brownish, you have to really pay attention...stir often, and don't walk away from the stove!

Add sliced, sweet onions to a hot cast iron skillet with melted butter.
This was one small onion and 2-3 Tbs butter and a sprinkling of salt.


After several minutes of cooking, they are already starting to brown
a bit. 

And, before you know it...they're getting overdone...sigh...
And now for the burgers...freshly ground, pattied and seasoned
with salt and pepper.

This is how I have to cook our burgers. Cook mine and the kids
first, flip, then add my husband's. He likes his still mooing. YUK.


I drizzled balsamic reduction over my burger, and enjoyed a simple
kale salad with green peppers, onions and homemade ranch dressing
along with it. Oh, and some Mediterranean seasoned potato chips.
Yummy!
Grinding your own hamburger may or may not be more economical. Our local butcher sells ground beef for $3.89 a pound right now, a chuck roast is $4.39. But honestly, I loved the beef I ground myself so much I think I just might be willing to pay a little more and do the work myself, at least if I'm going to make hamburgers. If it's going into chili or some other kind of ground beef dish, I'd stick with the pre-ground hamburger. A big, juicy, delicious hamburger really showcases the tenderness of home ground beef. 

What are your favorite ways to prepare burgers? Have you ever ground your own beef? What's your favorite way to use caramelized onions?

Tuesday, October 30, 2012

Today's Gluten Free Eats

My last post was of my surprising results at GF baking, bread and brownies! That makes me so happy. But that wasn't all we ate of course. Here's our menu for the day:

BREAKFAST:

Pumpkin Pie Millet and apple slices with "chia juice"

PUMPKIN PIE MILLET based on this great recipe at sugarfreemom.com
ingredients:
  • 2 cups water
  • 3/4 cup millet
  • 1/2 cup canned pumpkin (not pumpkin pie mix)
  • 1 tsp pumpkin pie spice
  • pinch of sea salt
  • 2 Tbs plain yogurt
  • generous splash of real vanilla
  • 1/4 cup real maple syrup
method:

Cook 3/4 cup dry millet in 2 cups of boiling water until water is absorbed, about twenty minutes. Add canned pumpkin, pumpkin pie spice, a pinch of sea salt, plain yogurt and maple syrup and mix well.  Serve warm with fruit or vanilla yogurt if desired.

Pumpkin Pie Millet...yum!

"Chia Juice" is a scoop of chia seeds in some home made grape juice I canned this summer. Stir for one minute, then let sit for five. The seeds get kind of gelatinous. Mister loves his chia juice!

LUNCH:

Carmelized Onion Burgers with Secret Sauce, Cottage Cheese, Monterrey Jack cheese slices, fresh broccoli


I had intended on eating tuna salad for lunch for some odd reason, just sounded good. My husband was home and requested a burger, and after making one for him I had a hankering for one myself.  His had Swiss cheese, but I like sharp Cheddar. The "Secret Sauce" started out with mayo and then I added a whole bunch of spices and some nutritional yeast. When I made mine, I kicked it up a notch with an extra dose of Emeril's Essense and a splash of Sweet Thai Chili Sauce. Mmmmm. 


"Dessert" was plain yogurt sweetened with honey, a splash of vanilla and a sprinkle of cinnamon. 

SUPPER:

Chili and Sticky Rice, veggies and homemade ranch dip, GF Brownies

No recipe for this...I grabbed a frozen chunk of leftover chili out of the freezer, dumped it in the crockpot, added some great northern beans and a generous splash of tomato juice and set it on low to cook for a while. Sticky Rice is glutinous rice (but not the kind of gluten that causes problems) and is steamed in a bamboo rice steamer. It's like the rice they use in Sushi. We love to dip it in our chili or just eat it plain. Not really a low glycemic index food, so I don't eat a lot of it, but man is it ever good. The GF Brownies were so delicious! You can read about these yummy brownies here. Then go make some, you won't be disappointed!

Monday, October 29, 2012

Our Gluten-Free Table Today

I have to admit I have not planned well for meals this week...I've gotten lazy over the last several days weeks months to be honest. And I surely wasn't prepared for planning gluten-free meals! What a blessing kind and generous friends are, let me tell you. Each day, I'm kind of "flying by the seat of my pants" and trying to pray about what to make, but it is so easy to just slip into "well, what sounds  good right now?" (along with the new "and how do I substitute the gluten ingredients in it?"). It's a process. 

Today, I am quite certain gluten should not be a part of my diet, and my son's for sure, and most likely my daughter's. I accidentally consumed something with gluten in it last night and I have felt terrible all day...the same way I felt after absentmindedly eating Hidden Valley Ranch - tired and hung-over-ish, no motivation aside from a strong desire to crawl back into bed and sleep. Blech. I don't think there's much gluten-containing foods worth feeling like that. Well, except for cheesecake, maybe. And my mom's Old Fashioned Cream Pie....

Other clues are that my son was, although active and boyish, not "spastic" and driving me out of my gourd all day. His BM today looked more like a normal one, his face looks less bumpy. And, for my daughter, the doctor's office called and said her TSH test was a little elevated and they want to recheck in eight weeks. I so want to save her from ending up like me so if her diet is contributing to the elevated TSH, tiredness, brain fog, etc. then I want to fix it now while she is young! I also need to really watch for soy, although we don't eat as much soy as we used to. Just something else I need to be vigilant in watching for when reading labels.

We ate fairly well today, I think:

  • Breakfast was scrambled eggs and fresh apple slices. I like sharp cheddar melted on top and smothered in homemade salsa and sour cream (the eggs, of course!)
  • Lunch was Millet Meatballs in Quinoa Rotini Pasta and homemade spaghetti sauce, sprinkled with freshly grated parmesan cheese and a side of fresh veggies. Very tasty! I was a little unsure if I'd like the Qunioa/corn pasta, but it was practically like "real" pasta. I love that it is made with Quinoa!
  • Supper is in the oven right now:  A hybrid Tater Tot Casserole. I quit buying canned soups ages ago, so it was a cornstarch-thickened gravy made with beef broth, sour cream  and nutritional yeast, browned ground beef, and green beans.  I am not sure if Tater Tots are safe yet (and I don't have any in the house, anyway), so I made mashed potatoes to put on top. All in one lovely, cast iron skillet too. Love those one-dish meals!
Here's how I made the Millet Meatballs (I just threw it together, so measurements are not guaranteed to be accurate!)

Millet Meatballs

ingredients:
  • one free range egg
  • 1/4-1/3 cup of leftover cooked, seasoned millet
  • 1/4 pound or so of ground beef
  • Miss Tink's House Seasoning
  • 1-2 Tbs nutritional yeast
  • 1-2 Tbs olive oil or fat of choice
method:
Whisk together egg, Miss Tink's, and nutritional yeast. Add millet and mix well, then add ground beef and mix very well. Form into meatballs. Gently heat olive oil in a cast iron skillet and brown meatballs on all sides until cooked through, or brown all sides then finish cooking in a 350 degree oven until cooked through, about 20 minutes. These can be seasoned however you like, of course...more garlic, some spicy hot pepper, even add shredded vegetables like carrot or zucchini. The kids and I loved them and there were none left over! I forgot to count how many it made, but my best guess is about 15 walnut-sized meatballs.
________________

I can't think of anything to go with our supper tonight, and honestly don't really care to make anything else. I just want to get done with the day and crawl into bed, into my nice, fragrant, freshly laundered flannel sheeties. I just love Fall!

Good Gluten-Free Eats to you!

Thursday, April 7, 2011

Oh Sweet Mercy…Loose Meat Sandwiches!

loosemeat sandwichGrowing up in the 80’s, I watched Roseanne a lot. One thing I was always curious about was the mysterious “Loose Meat” Sandwich. Several months ago, I searched for the recipe and found one. It was pretty tasty. Last night, I couldn’t think of anything that sounded good for supper. Then all of a sudden, Loose Meat dropped into my head and set my saliva glands into overdrive. I searched again for a recipe, this time finding a different one – and boy am I glad I did! This recipe blows the other one away…(Click on the picture to get a nice close-up view of this amazing sandwich!)

I have completely fallen in love with the Loose Meat Sandwich. Totally. Utterly. Head-over-heels, even. I’m eating them for breakfast right now as a matter of fact. And yes, I said ‘them’. I won’t elaborate on how many that entails…

It’s a fairly simple sandwich, although there is a technique involved and it does take a bit of time. But it is worth every second slaving over that hot stove to create this amazing little Midwestern delicacy.

They are known by several names. Maid Rite. Nu Way. Tavern Sandwiches. Apparently, they originated in  1924 at the Ye Olde Tavern in Sioux City, Iowa. I’ve never heard of them in my neck of the Midwestern woods, but I tell you…after making The Blue Mill Tavern Loosemeat Sandwich recipe I found last night on food.com, well, let’s just say I wouldn’t be opposed to spontaneously jumping in the van and driving to Iowa for lunch. Seriously, they’re THAT good! Only, I won't have to because I can make them at home.

There are a few other recipes floating around out there, but plantfreek, who posted the recipe, says:
“If you see a recipe for loosemeats that contains tomato juice-run! A loosemeat is a sloppy joe without the slop-so stay away from anything tomato-ey please!” (Be sure to check out the original recipe here and read the "About This Recipe" on the right...very informative and a great read!)
The first recipe I tried contained ground beef, onion, salt and pepper. That’s it. It was really good! Sounds kind of plain, but really, the way it’s cooked (especially if you use a cast iron skillet) and the toppings make it taste amazing.

And then…there’s The Blue Mill Tavern Loosemeat. With just a slight twist on the first recipe I found, it moved from an amazing sandwich to Sweet-Mercy-I-Have-Lived-Come-Take-Me-Now-Lord-delicious. My taste buds nearly leaped off my tongue in anticipation of delving into this sandwich...it was all I could do to keep from rushing the process and derailing perfection. Yeah, I love them that much!

Ok…I’ve extolled the virtuous taste of these sandwiches long enough. Let’s get to the meat of the matter…
INGREDIENTS:
  • 1 pound good quality ground chuck, round or sirloin
  • (if using round or sirloin) 1 Tb lard
  • 2 tsp salt, just enough to lightly coat the bottom of your skillet
  • 1 onion, finely chopped
  • 1 Tb yellow prepared mustard
  • 1 Tb white vinegar
  • 1 Tb sugar
  • water, enough to cover
  • salt and pepper to taste
  • hamburger buns
  • dill pickle slices
  • yellow prepared mustard
METHOD:
Get out a cast iron skillet. They absolutely are the best...if you don't have one, borrow one! Pre-heat skillet over medium heat. When skillet is heated thoroughly, sprinkle salt in the skillet and add ground beef.
**IMPORTANT** Using the back of a wooden spoon, crumble the meat as it cooks. It's essential that the meat is cooked in little crumbles. I don't have a wooden spoon...odd as that sounds (I'm waiting until I can get a good set of olive wood utensils)...so I used a metal spatula and kind of chopped it as it cooked, and that worked just fine. Add the onion and cook while browning the meat. Keep using the spoon or spatula to crumble the meat as it cooks.
When the meat is cooked, drain off any fat and return to the skillet. One of the comments left on this recipe said when you think the meat is done, cook it for five more minutes. Then cook it for one to two minutes more. This gives it a crispy crunchiness and tavern flavor. 
Next, add the mustard, vinegar, sugar, and enough water to barely cover the meat. Simmer, stirring occasionally, until ALL the water has disappeared...about 15 to 20 minutes. Add salt and pepper to taste.
Loosemeats are traditionally served on steamed buns, some like them toasted. I've made them both ways and they're both delicious. I think steaming them is quicker...toss them in a steamer basket for about 20 seconds and that's it.
Put some of the meat on the bottom bun, generously top with pickles and mustard. Top off with the top of the bun. Cast off all restraint and dig in!

 CHEF'S NOTES:
Two comments that helped the most in the original posting of the recipe are what I noted above about cooking the meat until it's kind of crispy and crunchy. I'm not talking about cooking it until it's hard little pellets, but you'll start to notice the crumbles getting brown and crispy on the edges. The other comment that was helpful was regarding the simmering. The commenter stated to simmer, simmer, simmer and simmer some more...it's essential that ALL the water is cooked out. This kind of leaves a carmelized coating on the crumbles. I tasted the meat at several stages during the cooking process and truly, the flavor you're after doesn't fully develop until the last few minutes. Be patient. If you can...it's worth it!
Plantfreek also said don't mess with the recipe...at least not the first time you make it. It's a very authentic rendition of the actual Blue Mill Tavern recipe, so make it like this first to experience it then tweak it if you think it needs it. Honestly, as a habitual recipe-tweaker, it was hard not to start adding things like garlic or whatever, but after making this, I wouldn't change a thing. It's perfect as is!
Of course, if you don't like pickles or mustard, you won't like the traditional way these are served: with plenty of both. I, however, love both and the slightly sweet taste of the meat balanced out with the salty, vinegary pickles and mustard are an absolute delight to my taste buds!
This wasn't as nourishing as I aim for because I used commercially-prepared hamburger buns made with white-death flour. But, I used good-quality locally raised ground chuck, sea salt, and home-canned pickles. So, it was mostly nourishing...and sometimes, that's the best that can come out of my kitchen. If I had planned ahead, I would have made my own hamburger buns and used grass-fed beef. There's always  next time...and this is one recipe I will make as often as I can get away with! I'm hoping that  means I can make them a lot since my husband said, in response to my comment about if we ever find ourselves in Iowa I want to eat the real deal there, "we could always move to Iowa..." 

Seriously, they really are that good!