Showing posts with label cast iron cooking. Show all posts

Wednesday, April 17, 2013

Home Ground Hamburgers with Carmelized Onions


After making my own ground beef from a grassfed beef chuck roast yesterday, I could only do one thing...make hamburgers for supper! There's lots of fancy ways to make burgers, but I opted for simple. Salt and pepper were the only seasonings this flavorful meat needed, although I should have used more salt. But, other than that they were delicious, juicy and tender. Grinding your own beef really results in a more tender burger. Not sure how, but it does. Check out how to grind your own hamburger on my DIY post: Make Your Own Ground Beef Using an Old Fashioned Grinder. 

I topped mine off with cheddar cheese, freshly sliced off the block and caramelized onions, hubby got Swiss cheese, and picky 12 year old daughter got mozzarella. Mister's got cheddar too.  I'm typing this the next morning, and I would love to have a cheeseburger for breakfast right now. They were that good!

Caramelized onions...those are something I am trying to master and I get varying results. One thing I can tell you is that they can go from caramelized to carbonized in the blink of an eye. They are not really something you should try to make while you're doing something else, especially if you have a tendency to be distractible. Not that I don't try to prove that wrong. I should think about making them before whatever I'm going to put them on, but what usually happens is I get some idea for [______] with Caramelized Onions and start making everything. I wonder if I could make a bunch and freeze them in small portions. I think I'll try that.

I cut out an article in the paper years ago about making caramelized onions and it takes forever to do it right. One of these days I'm going to follow those directions instead of doing it my way, I have a feeling they'll turn out better.  Or, I'll try making them in my crock pot, following the recipe I found at food.com, Crockpot Caramelized Onions.  Definitely look through the comments, there's some good tips there. 

How I Make Caramelized Onions, and Sometimes Carbonized...

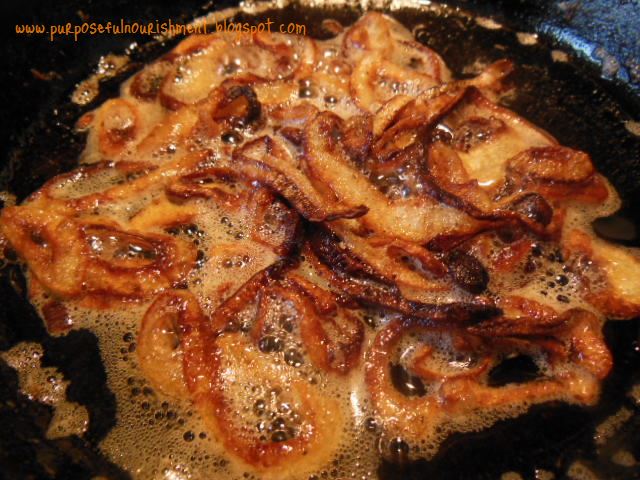
This is one of those "recipes" that is not really a recipe...I cut up some onion (I prefer Vidalia), melt some butter in a hot cast iron skillet, dump in the onions, salt them a bit, and let them cook slowly. Or try to. Seems like I always end up with the pan too hot. But anyway, stir them around to get them coated in the butter, and stir occasionally. When they start to turn brownish, you have to really pay attention...stir often, and don't walk away from the stove!

Add sliced, sweet onions to a hot cast iron skillet with melted butter.
This was one small onion and 2-3 Tbs butter and a sprinkling of salt.


After several minutes of cooking, they are already starting to brown
a bit. 

And, before you know it...they're getting overdone...sigh...
And now for the burgers...freshly ground, pattied and seasoned
with salt and pepper.

This is how I have to cook our burgers. Cook mine and the kids
first, flip, then add my husband's. He likes his still mooing. YUK.


I drizzled balsamic reduction over my burger, and enjoyed a simple
kale salad with green peppers, onions and homemade ranch dressing
along with it. Oh, and some Mediterranean seasoned potato chips.
Yummy!
Grinding your own hamburger may or may not be more economical. Our local butcher sells ground beef for $3.89 a pound right now, a chuck roast is $4.39. But honestly, I loved the beef I ground myself so much I think I just might be willing to pay a little more and do the work myself, at least if I'm going to make hamburgers. If it's going into chili or some other kind of ground beef dish, I'd stick with the pre-ground hamburger. A big, juicy, delicious hamburger really showcases the tenderness of home ground beef. 

What are your favorite ways to prepare burgers? Have you ever ground your own beef? What's your favorite way to use caramelized onions?

Tuesday, April 9, 2013

The Best Cornbread Ever...Seriously!

My husband is not as "into" food as I am. Food is just something you have to have to live, nothing to get excited about, really...at least for him anyway. I'm just the opposite...it's not just something you have to have to live, it's something to experience. Being a very sense-oriented person means that every aspect of a bite of something to eat is experienced...the way it looks, smells, and feels is just as important as how it tastes. 

If my husband says something is "very good", that is akin to receiving a Michelin Star in my book.  I've learned to not get offended if I just get an "it's good" or "it's OK" when I ask him how supper was. It's just not a big deal to him. I've also learned to relish those rare "very good" compliments and strive to get them more often.

This little number below really surprised me because it garnered a "wow this is really good" (a wordier version of the Very Good), which really amazed me because my husband does not particularly like cornbread. I'm not really crazy about it myself, although alongside a hearty bowl of chili or bean soup it's simply amazing, or can be anyway. I've been looking for "the" cornbread recipe and I think I've found it in this Gluten Free Buttermilk Cornbread Muffins recipe from The Baking Beauties, a site I plan to further explore as the tagline reads "gluten free recipes for everyday living."  While I like a good corn muffin, I just didn't feel like washing my muffin pan so I baked it in my lovely cast iron skillet. Mmmmmm. One of these days I'm going to get a cast iron muffin pan...

I loved this cornbread because it was moist, not dry and crumbly, and just had an amazing flavor. I used butter, "homemade" buttermilk (aka emergency buttermilk because I had none on hand...the old vinegar in milk trick), butter, and gluten free all purpose flour by C.C. Dolch Bakery. It contains millet, white rice and tapioca flours, tapioca starch and xanthan gum. I've been very happy with this flour so far.

GLUTEN FREE CORNBREAD MUFFINS (or cornbread, if you feel lazy)

ingredients:

  • 1/2 c butter
  • 2/3 c sugar (or less if you want)
  • 2 eggs
  • 1 c buttermilk
  • 1/2 tsp baking soda
  • 1 c cornmeal
  • 1 c gluten free flour 
  • 1/2 tsp xanthan gum
  • 1/2 tsp salt
method:

  1. Preheat oven to 350 degrees F. Grease muffin pan and set aside.
  2. In a microwave safe bowl, melt butter. Stir in sugar.
  3. Add eggs and stir to combine.
  4. Stir in buttermilk.
  5. Add dry ingredients, and stir until few lumps remain.
  6. Scoop into prepared muffin tin. (or pour into greased, preheated cast iron skillet)
  7. Bake for 20 minutes in preheated oven, or until a toothpick inserted into the center comes out clean. (30-40 minutes if using a skillet or baking dish instead of muffin pan)
  8. Allow to cool in pan for 5 minutes before removing to cooling rack. Best served warm.
chef's notes:

I used my favorite and trusty cast iron skillet in which I put about a tablespoon of beef tallow and put in the oven while it was preheating. It baked for about 35-40 minutes and turned out with a lovely crust, a little brown on top, and ooooh so yummy. The only change I would make is to omit the xanthan gum called for in the recipe because my all purpose flour already contained it. This is one recipe I don't feel the need to tinker with! Although I could see myself adding cheese or chilies or something like that some time, but honestly it's just perfect like it is.


Monday, October 29, 2012

Our Gluten-Free Table Today

I have to admit I have not planned well for meals this week...I've gotten lazy over the last several days weeks months to be honest. And I surely wasn't prepared for planning gluten-free meals! What a blessing kind and generous friends are, let me tell you. Each day, I'm kind of "flying by the seat of my pants" and trying to pray about what to make, but it is so easy to just slip into "well, what sounds  good right now?" (along with the new "and how do I substitute the gluten ingredients in it?"). It's a process. 

Today, I am quite certain gluten should not be a part of my diet, and my son's for sure, and most likely my daughter's. I accidentally consumed something with gluten in it last night and I have felt terrible all day...the same way I felt after absentmindedly eating Hidden Valley Ranch - tired and hung-over-ish, no motivation aside from a strong desire to crawl back into bed and sleep. Blech. I don't think there's much gluten-containing foods worth feeling like that. Well, except for cheesecake, maybe. And my mom's Old Fashioned Cream Pie....

Other clues are that my son was, although active and boyish, not "spastic" and driving me out of my gourd all day. His BM today looked more like a normal one, his face looks less bumpy. And, for my daughter, the doctor's office called and said her TSH test was a little elevated and they want to recheck in eight weeks. I so want to save her from ending up like me so if her diet is contributing to the elevated TSH, tiredness, brain fog, etc. then I want to fix it now while she is young! I also need to really watch for soy, although we don't eat as much soy as we used to. Just something else I need to be vigilant in watching for when reading labels.

We ate fairly well today, I think:

  • Breakfast was scrambled eggs and fresh apple slices. I like sharp cheddar melted on top and smothered in homemade salsa and sour cream (the eggs, of course!)
  • Lunch was Millet Meatballs in Quinoa Rotini Pasta and homemade spaghetti sauce, sprinkled with freshly grated parmesan cheese and a side of fresh veggies. Very tasty! I was a little unsure if I'd like the Qunioa/corn pasta, but it was practically like "real" pasta. I love that it is made with Quinoa!
  • Supper is in the oven right now:  A hybrid Tater Tot Casserole. I quit buying canned soups ages ago, so it was a cornstarch-thickened gravy made with beef broth, sour cream  and nutritional yeast, browned ground beef, and green beans.  I am not sure if Tater Tots are safe yet (and I don't have any in the house, anyway), so I made mashed potatoes to put on top. All in one lovely, cast iron skillet too. Love those one-dish meals!
Here's how I made the Millet Meatballs (I just threw it together, so measurements are not guaranteed to be accurate!)

Millet Meatballs

ingredients:
  • one free range egg
  • 1/4-1/3 cup of leftover cooked, seasoned millet
  • 1/4 pound or so of ground beef
  • Miss Tink's House Seasoning
  • 1-2 Tbs nutritional yeast
  • 1-2 Tbs olive oil or fat of choice
method:
Whisk together egg, Miss Tink's, and nutritional yeast. Add millet and mix well, then add ground beef and mix very well. Form into meatballs. Gently heat olive oil in a cast iron skillet and brown meatballs on all sides until cooked through, or brown all sides then finish cooking in a 350 degree oven until cooked through, about 20 minutes. These can be seasoned however you like, of course...more garlic, some spicy hot pepper, even add shredded vegetables like carrot or zucchini. The kids and I loved them and there were none left over! I forgot to count how many it made, but my best guess is about 15 walnut-sized meatballs.
________________

I can't think of anything to go with our supper tonight, and honestly don't really care to make anything else. I just want to get done with the day and crawl into bed, into my nice, fragrant, freshly laundered flannel sheeties. I just love Fall!

Good Gluten-Free Eats to you!

Wednesday, August 3, 2011

Apple Pie-itas

Do you ever just throw something together really quickly and it turns out amazingly yummy? I love it when that happens! Look what I did with a few simple ingredients today to satisfy my sweet tooth…

I’m really trying to cut sugar out of my diet. But, it’s really, really hard. Today, I had a really bad craving for something sweet and fortunately (or unfortunately, depending on how you look at it) I didn’t have any junky sweets laying around. We very rarely do, although on occasion I do buy my hubby cookies or there is leftover birthday cake.

My daughter had just made a quesadilla for lunch, and I started thinking about those fried cinnamon things from Taco Bell. I don’t really like them…they kind of remind me of pork rinds with cinnamon or maybe what fried paper towels would be like if you sprinkled them with cinnamon and sugar. Gross, either way you look at it.

I got an idea to fry up a tortilla in some butter and sprinkle some cinnamon sugar on top. Impromptu oreja de elefante. Then I got the idea to spread some homemade applesauce on that and drizzled a tiny bit of half n half (I’m unfortunately out of raw cream at the moment or that would have been even better!). I rolled it up and tooka bite and WOW was that good. Really satisfied my sweet tooth!

It could have been healthier…homemade tortilla instead of store-bought, sucanat or raw sugar instead of white, and raw cream instead of pasteurized half n half, but I think it was still infinitely more healthy than an apple pie from Mc Death’s.  Honestly, it kind of tasted like one…but better! I will be making these again with more healthy ingredients next time, but I’m glad I found a way to make something delicious, inexpensive, quick, and with minimal heat added to my kitchen on this hot, sunny day!


100_3430
I quick took a picture before it was gone...click on the picture for an up close and delicious look!


APPLE PIE-ITAS


INGREDIENTS:
  • 1 soft tortilla
  • 1 Tb butter (or other healthy, traditional fat) for frying  I think coconut oil would be awesome!
  • 1 tsp (more or less to taste) cinnamon sugar, or combine your favorite sugar and cinnamon
  • 1-2 Tbs unsweetened or lightly sweetened applesauce
  • drizzle of raw cream
  • a bit more cinnamon sugar to sprinkle on top, if desired
Makes 1 serving


METHOD:

Melt fat in cast iron skillet, add tortilla and coat well in melted fat. Flip over to coat other side, then fry each side until slightly crispy (you need to be able to roll it up). Remove from pan, sprinkle with cinnamon sugar. Spread applesauce on top, drizzle with cream and stir it around a bit until combined. Roll tortilla, sprinkle with more cinnamon sugar, if desired. Eat. Would also be good topped with fresh raw whipped cream, raw vanilla ice cream, yogurt or kefir!

Thursday, April 14, 2011

Blueberry Bliss: Whole Wheat Pancakes with Blueberry Compote

ww pancakes w blueberry compote I woke up  wanting pancakes, and after perusing my latest copy of Woman’s Day this morning, I had a plan – pancakes with blueberry compote (pg 182 of the May 2011 issue or you can click here for a slide show presentation of the article “How to Make Pancakes”).  Of course, since I’ve basically eschewed White Death Flour, I make 100% whole wheat pancakes now. I decided to look for a new recipe since I’d just been adapting my normal pancake recipe by substituting whole wheat flour. I found this delicious recipe at AllRecipes.com and made a couple adaptations to suit our real-food lifestyle…


I left the blueberries out of the pancakes and made Blueberry Compote instead…recipe follows the pancake recipe

INGREDIENTS:
  • 1 1/4 c whole wheat flour
  • 2 tsp baking powder (aluminum-free)
  • 1 egg (pastured)
  • 1 c milk (raw)(+ up to 1/4 cup more if needed)
  • 1/2 tsp salt (sea)
  • 1 tbs artificial sweetner raw sugar
  • 1 tbs melted coconut oil (no oil called for in original recipe)
  • 1/2 c blueberries
METHOD:

Sift together the flour and baking powder (I’m too “efficient” for that…just mix them together well!), set aside. Beat together the egg, milk, salt and sugar in a bowl. Stir in flour until just moistened, add coconut oil and blueberries and stir to incorporate.

Cook pancakes on a hot griddle or cast iron skillet. The most important part of making great pancakes is PATIENCE! You simply MUST wait until it’s the right time to flip them…when the top is bubbly and the edges look dry, then it’s time to flip. It’s hard, I know…I’m still guilty of premature pancake flipping from time to time…I don’t like to wait…

Serve with your favorite pancake toppings…might I suggest:

Organic, pastured butter made from raw cream and this fabulously easy and delicious Blueberry Compote recipe with a drizzle of fresh, raw cream…


The link above will take you to Woman’s Day magazine’s website, where you’ll find a slideshow showing how to make perfect pancakes. This recipe is on step 4 of the slide show, or on pg 182 of the May 2011 issue of Woman’s Day

INGREDIENTS:
  • 2 c frozen (or ideally, fresh organic) blueberries
  • 2 tsp fresh lemon juice
  • 2 tbs raw sugar (I actually used less and it was still delicious…adjust for your taste)
METHOD:

In a small saucepan, combine all ingredients and simmer, stirring occasionally, until slightly thickened and syrupy, 5 to 6 minutes

wwpancakes eaten
Bon appetit!

Thursday, April 7, 2011

Oh Sweet Mercy…Loose Meat Sandwiches!

loosemeat sandwichGrowing up in the 80’s, I watched Roseanne a lot. One thing I was always curious about was the mysterious “Loose Meat” Sandwich. Several months ago, I searched for the recipe and found one. It was pretty tasty. Last night, I couldn’t think of anything that sounded good for supper. Then all of a sudden, Loose Meat dropped into my head and set my saliva glands into overdrive. I searched again for a recipe, this time finding a different one – and boy am I glad I did! This recipe blows the other one away…(Click on the picture to get a nice close-up view of this amazing sandwich!)

I have completely fallen in love with the Loose Meat Sandwich. Totally. Utterly. Head-over-heels, even. I’m eating them for breakfast right now as a matter of fact. And yes, I said ‘them’. I won’t elaborate on how many that entails…

It’s a fairly simple sandwich, although there is a technique involved and it does take a bit of time. But it is worth every second slaving over that hot stove to create this amazing little Midwestern delicacy.

They are known by several names. Maid Rite. Nu Way. Tavern Sandwiches. Apparently, they originated in  1924 at the Ye Olde Tavern in Sioux City, Iowa. I’ve never heard of them in my neck of the Midwestern woods, but I tell you…after making The Blue Mill Tavern Loosemeat Sandwich recipe I found last night on food.com, well, let’s just say I wouldn’t be opposed to spontaneously jumping in the van and driving to Iowa for lunch. Seriously, they’re THAT good! Only, I won't have to because I can make them at home.

There are a few other recipes floating around out there, but plantfreek, who posted the recipe, says:
“If you see a recipe for loosemeats that contains tomato juice-run! A loosemeat is a sloppy joe without the slop-so stay away from anything tomato-ey please!” (Be sure to check out the original recipe here and read the "About This Recipe" on the right...very informative and a great read!)
The first recipe I tried contained ground beef, onion, salt and pepper. That’s it. It was really good! Sounds kind of plain, but really, the way it’s cooked (especially if you use a cast iron skillet) and the toppings make it taste amazing.

And then…there’s The Blue Mill Tavern Loosemeat. With just a slight twist on the first recipe I found, it moved from an amazing sandwich to Sweet-Mercy-I-Have-Lived-Come-Take-Me-Now-Lord-delicious. My taste buds nearly leaped off my tongue in anticipation of delving into this sandwich...it was all I could do to keep from rushing the process and derailing perfection. Yeah, I love them that much!

Ok…I’ve extolled the virtuous taste of these sandwiches long enough. Let’s get to the meat of the matter…
INGREDIENTS:
  • 1 pound good quality ground chuck, round or sirloin
  • (if using round or sirloin) 1 Tb lard
  • 2 tsp salt, just enough to lightly coat the bottom of your skillet
  • 1 onion, finely chopped
  • 1 Tb yellow prepared mustard
  • 1 Tb white vinegar
  • 1 Tb sugar
  • water, enough to cover
  • salt and pepper to taste
  • hamburger buns
  • dill pickle slices
  • yellow prepared mustard
METHOD:
Get out a cast iron skillet. They absolutely are the best...if you don't have one, borrow one! Pre-heat skillet over medium heat. When skillet is heated thoroughly, sprinkle salt in the skillet and add ground beef.
**IMPORTANT** Using the back of a wooden spoon, crumble the meat as it cooks. It's essential that the meat is cooked in little crumbles. I don't have a wooden spoon...odd as that sounds (I'm waiting until I can get a good set of olive wood utensils)...so I used a metal spatula and kind of chopped it as it cooked, and that worked just fine. Add the onion and cook while browning the meat. Keep using the spoon or spatula to crumble the meat as it cooks.
When the meat is cooked, drain off any fat and return to the skillet. One of the comments left on this recipe said when you think the meat is done, cook it for five more minutes. Then cook it for one to two minutes more. This gives it a crispy crunchiness and tavern flavor. 
Next, add the mustard, vinegar, sugar, and enough water to barely cover the meat. Simmer, stirring occasionally, until ALL the water has disappeared...about 15 to 20 minutes. Add salt and pepper to taste.
Loosemeats are traditionally served on steamed buns, some like them toasted. I've made them both ways and they're both delicious. I think steaming them is quicker...toss them in a steamer basket for about 20 seconds and that's it.
Put some of the meat on the bottom bun, generously top with pickles and mustard. Top off with the top of the bun. Cast off all restraint and dig in!

 CHEF'S NOTES:
Two comments that helped the most in the original posting of the recipe are what I noted above about cooking the meat until it's kind of crispy and crunchy. I'm not talking about cooking it until it's hard little pellets, but you'll start to notice the crumbles getting brown and crispy on the edges. The other comment that was helpful was regarding the simmering. The commenter stated to simmer, simmer, simmer and simmer some more...it's essential that ALL the water is cooked out. This kind of leaves a carmelized coating on the crumbles. I tasted the meat at several stages during the cooking process and truly, the flavor you're after doesn't fully develop until the last few minutes. Be patient. If you can...it's worth it!
Plantfreek also said don't mess with the recipe...at least not the first time you make it. It's a very authentic rendition of the actual Blue Mill Tavern recipe, so make it like this first to experience it then tweak it if you think it needs it. Honestly, as a habitual recipe-tweaker, it was hard not to start adding things like garlic or whatever, but after making this, I wouldn't change a thing. It's perfect as is!
Of course, if you don't like pickles or mustard, you won't like the traditional way these are served: with plenty of both. I, however, love both and the slightly sweet taste of the meat balanced out with the salty, vinegary pickles and mustard are an absolute delight to my taste buds!
This wasn't as nourishing as I aim for because I used commercially-prepared hamburger buns made with white-death flour. But, I used good-quality locally raised ground chuck, sea salt, and home-canned pickles. So, it was mostly nourishing...and sometimes, that's the best that can come out of my kitchen. If I had planned ahead, I would have made my own hamburger buns and used grass-fed beef. There's always  next time...and this is one recipe I will make as often as I can get away with! I'm hoping that  means I can make them a lot since my husband said, in response to my comment about if we ever find ourselves in Iowa I want to eat the real deal there, "we could always move to Iowa..." 

Seriously, they really are that good!


Saturday, February 5, 2011

Low GI Cooking Adventure: Grassfed Beef and Italian Vegetable Skillet with Buttery Herbed Brown Rice


Ever get some news that just throws a big old wrench in your works? Chaps your khakis? And generally just makes your life a big pain in the derriere?  Yeah, 2011's just turning out to be that kind of year so far...

HELLO, I'VE GOT BAD NEWS FOR YOU

I got the wonderful news this week that my blood sugar is out of whack. Super. Just what I need...one more thing to have to manage. I'm having flashbacks to my pregnancy with my son, where I ended up having to use insulin. By the end of my pregnancy I hated food. If it weren't for the fact that I had a precious Li'l Man depending on me to keep him healthy, I think I would have just quit eating. Every waking moment of every day revolved around what went in my  mouth:  wake up, prick my finger, check my blood, write it down, figure out what I CAN eat, try to find something I WANT to eat out of that, measure this and measure that, write it down,  then two hours later it started all over again, only then I often needed to give myself a shot.  It was horrible. And now...the finger-pricker and glucose meter have returned. At least there's no insulin this time, I guess.

THERE'S NOTHING IN THIS HOUSE TO EAT, FOR REAL

Today, I spent most of the day starving hungry because there's just not much in the house that's low GI...some almonds, celery and frozen veggies. And eggs...but I have to be in the mood to eat eggs. I was so hungry nothing sounded good. I had a headache. I was very crabby. I'm still mad about all of this anyway.

So, I had to go to the grocery store and find something to make for supper that wouldn't send my blood sugar to the moon. It had to have a low Glycemic Index. It had to sound appetizing. It also had to be cheap. And, I went hungry and crabby and with both kids in tow. Not really the best idea, now that I look back on that.

COOKING ON THE FLY

Earlier in the day I had hoofed it down to the best little butcher shop I know and picked up some of that delicious grassfed beef. I know there's venison in the freezer, but I have been craving some of that wonderful beefy goodness for some time...and darn it, if I have to mess around with all this blood sugar nonsense I'm going to eat at least some of the foods I love. That marvelous meat was the basis of the meal I was trying to formulate, and I decided some brown rice would be good as it is full of fiber and doesn't have a huge impact on blood sugar.  But what else? It's hard to think when you're hungry, your head hurts, you're completely irritated, and your kids apparently don't notice that fact...or they do...

I found some red peppers marked down for 50 cents for two, grabbed a cucumber and some frozen veggies and a few other things just to have around. When I got home, this is what I came up with:

Grassfed Beef and Italian Vegetable Skillet
INGREDIENTS
1 lb ground grassfed beef
16 oz package frozen Italian Blend vegetables (zucchini squash, cauliflower, carrots, Italian style green beans, baby lima beans and red bell peppers)
1 c broth (I used organic, free range chicken broth)
1 clove garlic, minced or pressed; or garlic powder to taste
sea salt, to taste
freshly ground black pepper, to taste
1 Tbs cornstarch + a small amount of water for thickening (optional)
METHOD:
Brown ground beef until no pink remains, season with salt and pepper while cooking; about half way through add fresh garlic. Add broth and bring to a low boil, add vegetables, stirring well. Return to a low boil, reduce heat, cover and simmer, stirring occasionally, until vegetables are done to your liking, about 7-10 min. Combine cornstarch and water and stir into mixture to thicken, if desired. Serve with Buttery Herbed Brown Rice (recipe follows)
This is not overly seasoned in order to allow the wonderful flavor of the grassfed beef to take center stage. You could, of course, add whatever seasonings you like to it. I found that the lightly seasoned brown rice complimented this very well without overpowering that lovely meat.

BUTTERY HERBED BROWN RICE
INGREDIENTS:
2 c water
1-2 Tb butter, divided
3/4 - 1 c brown rice
sea salt, to taste
1/2 - 1 Tbs Italian Seasoning

METHOD:
In a 2 quart sauce pan, bring water, a pinch of sea salt, and half the butter to a boil. Add rice, stir well, return to boil then reduce heat and cover. Cook for 20 minutes or until most of the water has been absorbed. Add the rest of the butter and all of the Italian Seasoning, stirring well. Add more sea salt if desired.
THE VERDICT
It really turned out to be quite delicious. Our locally-raised (as in just a couple miles away) grassfed beef has the most exquisite flavor...helped also by a well-seasoned cast iron skillet. I almost hate to even put salt on it! But I try to get a little sea salt into everything to increase our mineral intake. If I were to use regular ground beef from the grocery store, I'd have added all kinds of things from my spice cabinet.  Sliced fresh red and green bell peppers and cucumbers were served along with this as well.

GLYCEMIC INDEX
As far as the GI of this meal, I don't really know exactly. The lists I've found for foods and their GI values don't say what the serving size is so until I can find that information I'll just have to take a stab at it:
  • meat, of course, has zero carbs...that's a good start
  • green beans, cauliflower, 15
  • carrots, 16
  • red peppers, 10
  • baby lima beans, 32
  • cucumbers, green peppers, 0
  • brown rice, 50
All of these foods are considered "low GI". To me, 50 sounds kind of high, but compared to glutinous rice (my most favorite Asian food ever...Sticky Rice!) that runs from 86-98 depending on the list you look at, well, that's not so bad.  Do I add all these numbers up and average them? What does all this mean? How will this meal impact my blood sugar level? I have no idea! I have a book on the way about low GI dieting so hopefully it will clear up all these nagging little questions.

It's been about half an hour or so since I ate. I feel reasonably satisfied, although there is this underlying, nagging feeling of some little monster wanting to be fed. Sugar withdrawal I guess....it's reminiscent of when I did the Atkin's diet years ago. Which, by the way, I hated but lost 40 pounds while doing. I don't eat much sugar anymore...that's the real kicker!  And I use as much whole grains as I possibly can. I hope I don't have to do a "no carb" diet...that would not really work for me. At all.

Thanks, 2011. You stink. 

Tuesday, January 18, 2011

Perfect Scrambled Eggs

Do you like scrambled eggs? Have you ever noticed that one morning they turn out beautifully: light, fluffy, flavorful....and the next time you make them, they're flat, rubbery and weird-tasting? Maybe you've never had problems with scrambling eggs...on the surface, it seems as though that's one of those basic kitchen skills we were all supposed to pick up from our moms or at least in the obligatory Home Ec class in school. You know, right below boiling water. 

I must admit, this easy-to-prepare dish didn't always turn out perfectly for me. I was, at least, consistent with my inconsistency.

Always in search of better ways to make the foods I prepare at home, I googled "perfect scrambled eggs" one day. Turns out there's more to it than just beating an egg and throwing it in a pan. There's actually some science involved! And, being a homeschooler I was simply delighted to learn that. Of course, now I must share my newly found knowledge with you. I'm sure your breakfast-eaters will appreciate that!

The Science Behind the Scramble

I'd like to thank Mr. Breakfast for enlightening me on the whole scrambled egg deal.  I think most people would agree that  whisking an egg vigorously will incorporate some air into there, which lends to a fluffy scrambled egg. But wait, there's more! Whisking the egg begins to break down and "unravel" the protein molecules, wherein the air you're whisking in gets trapped. Mr. Breakfast explains that "As the eggs cook, protein molecules firm-up around the air bubbles resulting in a spongy texture and hopefully full and fluffy scrambled eggs." And of course, if you overdo the whisking, you'll just completely unravel the protein molecules and there won't be any place for the air bubbles to become entrapped. You end up with flat, rubbery eggs. 

The proper whisking technique is to hold your whisk at an angle instead of vertically. This makes me think of 50's housewives in their pretty dresses, frilly aprons, pearls and heels...I'm not sure why, but it does. 

So, Let's Get Crackin'

Now that you know what's going on in the pan, let's give it a whirl.  First things first...a list of ingredients and equipment you will need:
  • eggs
  • milk
  • butter
  • salt and pepper
  • bowl
  • whisk or fork
  • pan
As with anything, quality does count. You need some good eggs.  Like some just-laid eggs from your friend's backyard free-ranging, dirt-scratching, bug-eating chickens . Them's some good eggs. I also recommend some fresh-from-the-farm milk. This chicken here just might have laid one of the eggs I used to make these marvelously magnificent scrambled eggs:


I love my friend's chickens. They make me giggle every time I'm around them.  Cluck...cluck...cluck...Check out her blog at The Homesteading Hippy!


Mr. Breakfast also says that, according to the American Egg Board, properly beaten eggs are "frothy and evenly colored." Mr. Breakfast says after about two minutes, your eggs should look like that. If I'm only doing a couple eggs (his recipe is for six eggs), I usually achieve frothy and even-colored eggs in less than two minutes.


And, you've just got to cook in cast iron. Really. I won't cook eggs in anything else. A properly seasoned pan requires very little, if any, butter, oil or cooking spray to prevent sticking.  Plus, there's the added benefit of getting extra iron in your diet, in case fabulous flavor and non-stick cooking don't convince you.  Whatever pan you're using, you need to get it nice and hot before adding the eggs.  Not to where it's smoking, of course...Mr. Breakfast says just above medium.

Martha Stewart, of Course, Makes Perfect Eggs

Ok...pan's hot, eggs are beaten...now what? There are a few schools of thought on the best way to scramble the eggs once they've hit the pan.  Mr. Breakfast included Martha Stewart's method, and I heartily recommend it.  

If you've added butter to your pan (and I do, even with the cast iron because it just tastes so delicious!), let it melt completely then add your beaten eggs...but resist that urge to start scrambling them around in the pan. Let them begin to set first, then take your spatula and from the edges, start pushing the set part in to the middle of the pan, allowing the rest of the eggs to spill out around what you've pushed into the middle. Tilt the skillet if necessary to get the runny part evenly distributed. Continue this until there is no more runny eggs to cook. I like to keep it in one big, fluffy pile but you can break the eggs up into pieces if you like. Continue cooking until they are as done as you like, but don't overcook!  Season to taste with salt and pepper. Dig in. Be amazed at the fluffy deliciousness of the eggs you just cooked. Just like Martha Stewart does.


Then, if you're like my son...you'll ruin them with ketchup...but, to each his own. I like Bang Bang sauce on mine, to be honest with you.  Here's a recipe I put on my old blog:  Bang Bang Sauce...I'll Put That on ANYTHING!

Wednesday, July 21, 2010

Menu? We Don't Need No Stinkin' Menu...

Well, at least that's what it seems like these last few weeks. I have gotten very lazy about menu planning. In fact, it's Wednesday night and I should have a menu planned and coupons organized by now. And, well, I don't!  The pantry and fridge are getting pretty bare, so it was a Throw-Something-In-A-Pan-And-Pray kind of night. It actually turned out very tasty! Seems like some of my best meals are forged in the adversity of a bare pantry...

Summer Garden Skillet


INGREDIENTS:
  • 1/2 pound bulk sausage $1
  • 2 Yukon Gold potatoes, peeled and diced FREE
  • 1/3 cup Vidalia onion, chopped $0.40
  • 1/2 can garlic, basil and oregano seasoned diced tomatoes, with juice $0.10 from Stetta's Discount
  • 2 large,white button mushrooms, sliced $0.26
  • 1/3 of a large zucchini, sliced into 2 inch spears FREE
  • Sea salt and pepper to taste
METHOD: 

Brown sausage in pre-heated, medium cast iron skillet; drain if necessary. Add potatoes and onion and cook, turning occasionally, until potatoes are almost tender. Add tomatoes and juice, bring to a simmer and add mushrooms and zucchini. Cook until zucchini is crisp-tender. 

TOTAL COST: $1.76, COST PER SERVING: 59 CENTS. This served 3 adults comfortably, Miss Picky and Mister Messter didn't eat much and there were no leftovers. It could have easily stretched farther with more vegetables. I didn't figure in the cost of the biscuits, but I'm sure it was less than $1 for the batch. If I'd had the time or inclination, I would have whipped up more of a delicious cucumber salad I made recently. A crisp, green salad would have gone nicely with this as well as some fresh fruit. This would have altered the cost of the meal, but I speculate it could still stay under $3 for the total meal, assuming that you have a vegetable garden or access to free or very inexpensive vegetables.

The improvements to the highlighted items are generally the same as the last post...sausage could have been from pastured animals, veggies and fungus could have been organic. And the BPA in cans makes the tomatoes a less than desirable choice. I would much rather prefer to pick some tomatoes from my back yard. However, they are still quite green...although I did entertain the idea! I did love how the seasoned tomatoes made this very simple, I just added a little sea salt and organic black pepper. When I can tomatoes this year, I want to do some seasoned with herbs and garlic.  I served it with whole wheat biscuits made with olive oil. They turned out a little dry, I will have to work on that recipe! All in all, it was very delicious and satisfying. I love summer produce!

This dish was still far more healthy (not to mention economical) than something prepared from a box or picked up at a drive through. We went to a movie today ($1 tickets!), and ate at Wendy's before we went. I have to say that while it tasted fairly good, it was not satisfying in the least. I was still hungry for hours later...I think my body was craving real food! After our supper this evening, I am much more satisfied. I used to eat at fast-food places fairly regularly, especially when I was younger and it never phased me. Now that I have not been eating as many chemicals, preservatives and refined foods, I really notice a difference in how I feel. Even one meal at a burger joint upsets the balance. I was a crab this evening, and my daughter had a stomach ache. It just strengthens my resolve to do the best I can to serve real, whole, nourishing foods to my family.

Wednesday, June 16, 2010

Suppertime, You Used to be My Friend...

Recently, I realized that I am beginning to dread the hour or so immediately before suppertime at my house these days. Probably mostly due to the lack of planning on my part...but also because that time of the day has become vapid...I'm bored with food.  I don't even really want to try new foods. I don't want to bother with eating.

My family...well, they expect to be fed and fed well as I have set the bar high for myself. Now, I am bored with cooking simply because I am losing interest in food to some degree. There would be much more time in the day for snuggles and walks and splashing in the pool if I just didn't have to fool with meal preparation.

Like that's going to happen any time soon...

Today, the return of the familiar It's Five Thirty and I Have No Idea What to Make for Supper Villian came sauntering through my kitchen...well, dining room actually...that's where I was glued to the computer at the time. I finally decided to go face my arch nemesis...Suppertime.

Fortunately, I was armed to the gills with cookbooks and instant access to millions of recipes at a few strokes of the keyboard so my nemesis was doomed from the start. I also had my faithful sidekick Freezer on my side (though I wonder how well Little Freezer Over the Refrigerator will feel when Chest Freezer moves in this weekend...) who produced a bowl of chili thrown together a few weeks ago. Fire roasted tomatoes, navy beans, my secret mystery blend of spices (a mystery because I'm a "dump cook" and don't remember what I dumped in there), and some organic, free range, wild fed "forest beef" my husband bagged during deer season last year. Quite tasty. I had made it for some friends who came over to watch a race, and she (who is very finicky about chili and won't even eat her mom's) ate two bowls of mine. One bowl could be considered polite, but a second helping would indicate to me that it was good...or she was absolutely starving, perhaps.


Needing a side dish to go with the chili, I decided that corn bread sounded good. A quick perusal on the web and I realized I was woefully unprepared for making cornbread...I had forgotten to get eggs this week. And since I live in a rural town that apparently is infected with some kind of poultry bigotry, I can not have a couple of chickens in my back yard to keep me supplied with fresh, organic, free range chicken eggs. So, a change in search parameters to eggless cornbread dredged up a couple of promising recipes. Here's the one I went with (and my modifications):

EGGLESS CORNBREAD  
courtesy of theonlinerecipebox.com

Ingredients:
  • 1 1/2 cups milk
  • 1 1/2 tablespoons vinegar
  • 1 cup cornmeal
  • 1 cup flour
  • 2 tablespoons sugar
  • 3/4 teaspoons salt
  • 1 teaspoon baking powder
  • 1/2 teaspoon baking soda
  • 2 tablespoons oil
Directions:
  1. Preheat the oven to 425°F.
  2. Combine the milk and vinegar and let stand.
  3. Mix dry ingredients in a large bowl.
  4. Add the milk mixture and the oil into dry ingredients and stir until just blended.
  5. Pour the batter into a lightly greased 9-inch square baking dish, and bake for 25 to 30 minutes, or until a toothpick inserted in the center comes out clean.
Kitchen Magician's Tricks...
  • I halved this recipe, just in case I didn't like it...and since my hubby doesn't like cornbread anyway I didn't want a bunch of leftovers. 

  • I was also concerned that it just wouldn't rise well. I've made a recipe called "Eggless Chocolate Cake" that used mayonnaise. Not actually eggless, since mayo is made with eggs, but if you don't have an actual egg, you can still make a delicious chocolate cake. I added a spoonful (regular eating spoon) of mayonnaise, just for good measure. 

  • I used olive oil
  • I used sea salt (I think the minerals in sea salt help give nice rise to baked goods, just a theory)
  • I sprinkled crumbled co-jack cheese, onion powder, garlic powder and freshly ground black pepper on top
  • I "baked" this in a cast iron skillet (covered),  with a couple tablespoons of melted butter,  on top of my stove over medium-high heat for around 20 minutes or so. The bottom of the cornbread got kind of, well, let's say extra done, but we just didn't eat that part.

The end result was actually very delicious. The cornbread had a nice, crispy outside, delicious cheesy, oniony, garlicky flavor with just enough pepper flavor to not be overbearing. Inside was moist and fluffy, yet with enough structure to not crumble as soon as you touch it. I think it was one of the best cornbreads I've ever made.

So, in the end, Suppertime was vanquished to the far-off realms of Stretchy Waistband Land and Mom has lived to cook another day. Will Suppertime return tomorrow, begging for a rematch? Tune in tomorrow...same batter bowl...same stove...but hopefully, something excitingly different to eat!