Showing posts with label easy. Show all posts

Wednesday, April 17, 2013

Home Ground Hamburgers with Carmelized Onions


After making my own ground beef from a grassfed beef chuck roast yesterday, I could only do one thing...make hamburgers for supper! There's lots of fancy ways to make burgers, but I opted for simple. Salt and pepper were the only seasonings this flavorful meat needed, although I should have used more salt. But, other than that they were delicious, juicy and tender. Grinding your own beef really results in a more tender burger. Not sure how, but it does. Check out how to grind your own hamburger on my DIY post: Make Your Own Ground Beef Using an Old Fashioned Grinder. 

I topped mine off with cheddar cheese, freshly sliced off the block and caramelized onions, hubby got Swiss cheese, and picky 12 year old daughter got mozzarella. Mister's got cheddar too.  I'm typing this the next morning, and I would love to have a cheeseburger for breakfast right now. They were that good!

Caramelized onions...those are something I am trying to master and I get varying results. One thing I can tell you is that they can go from caramelized to carbonized in the blink of an eye. They are not really something you should try to make while you're doing something else, especially if you have a tendency to be distractible. Not that I don't try to prove that wrong. I should think about making them before whatever I'm going to put them on, but what usually happens is I get some idea for [______] with Caramelized Onions and start making everything. I wonder if I could make a bunch and freeze them in small portions. I think I'll try that.

I cut out an article in the paper years ago about making caramelized onions and it takes forever to do it right. One of these days I'm going to follow those directions instead of doing it my way, I have a feeling they'll turn out better.  Or, I'll try making them in my crock pot, following the recipe I found at food.com, Crockpot Caramelized Onions.  Definitely look through the comments, there's some good tips there. 

How I Make Caramelized Onions, and Sometimes Carbonized...

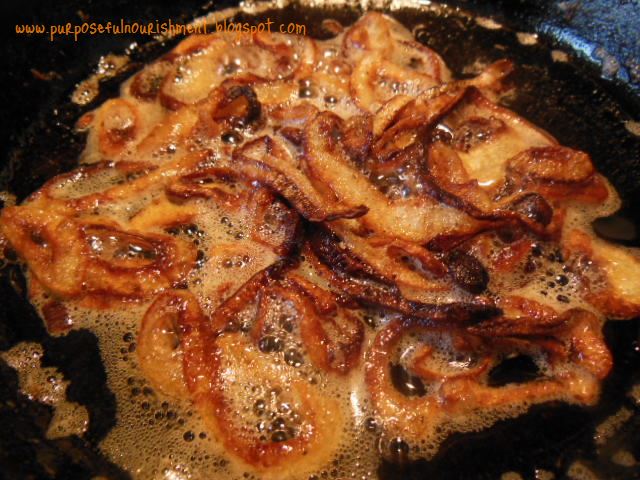
This is one of those "recipes" that is not really a recipe...I cut up some onion (I prefer Vidalia), melt some butter in a hot cast iron skillet, dump in the onions, salt them a bit, and let them cook slowly. Or try to. Seems like I always end up with the pan too hot. But anyway, stir them around to get them coated in the butter, and stir occasionally. When they start to turn brownish, you have to really pay attention...stir often, and don't walk away from the stove!

Add sliced, sweet onions to a hot cast iron skillet with melted butter.
This was one small onion and 2-3 Tbs butter and a sprinkling of salt.


After several minutes of cooking, they are already starting to brown
a bit. 

And, before you know it...they're getting overdone...sigh...
And now for the burgers...freshly ground, pattied and seasoned
with salt and pepper.

This is how I have to cook our burgers. Cook mine and the kids
first, flip, then add my husband's. He likes his still mooing. YUK.


I drizzled balsamic reduction over my burger, and enjoyed a simple
kale salad with green peppers, onions and homemade ranch dressing
along with it. Oh, and some Mediterranean seasoned potato chips.
Yummy!
Grinding your own hamburger may or may not be more economical. Our local butcher sells ground beef for $3.89 a pound right now, a chuck roast is $4.39. But honestly, I loved the beef I ground myself so much I think I just might be willing to pay a little more and do the work myself, at least if I'm going to make hamburgers. If it's going into chili or some other kind of ground beef dish, I'd stick with the pre-ground hamburger. A big, juicy, delicious hamburger really showcases the tenderness of home ground beef. 

What are your favorite ways to prepare burgers? Have you ever ground your own beef? What's your favorite way to use caramelized onions?

Tuesday, April 9, 2013

The Best Cornbread Ever...Seriously!

My husband is not as "into" food as I am. Food is just something you have to have to live, nothing to get excited about, really...at least for him anyway. I'm just the opposite...it's not just something you have to have to live, it's something to experience. Being a very sense-oriented person means that every aspect of a bite of something to eat is experienced...the way it looks, smells, and feels is just as important as how it tastes. 

If my husband says something is "very good", that is akin to receiving a Michelin Star in my book.  I've learned to not get offended if I just get an "it's good" or "it's OK" when I ask him how supper was. It's just not a big deal to him. I've also learned to relish those rare "very good" compliments and strive to get them more often.

This little number below really surprised me because it garnered a "wow this is really good" (a wordier version of the Very Good), which really amazed me because my husband does not particularly like cornbread. I'm not really crazy about it myself, although alongside a hearty bowl of chili or bean soup it's simply amazing, or can be anyway. I've been looking for "the" cornbread recipe and I think I've found it in this Gluten Free Buttermilk Cornbread Muffins recipe from The Baking Beauties, a site I plan to further explore as the tagline reads "gluten free recipes for everyday living."  While I like a good corn muffin, I just didn't feel like washing my muffin pan so I baked it in my lovely cast iron skillet. Mmmmmm. One of these days I'm going to get a cast iron muffin pan...

I loved this cornbread because it was moist, not dry and crumbly, and just had an amazing flavor. I used butter, "homemade" buttermilk (aka emergency buttermilk because I had none on hand...the old vinegar in milk trick), butter, and gluten free all purpose flour by C.C. Dolch Bakery. It contains millet, white rice and tapioca flours, tapioca starch and xanthan gum. I've been very happy with this flour so far.

GLUTEN FREE CORNBREAD MUFFINS (or cornbread, if you feel lazy)

ingredients:

  • 1/2 c butter
  • 2/3 c sugar (or less if you want)
  • 2 eggs
  • 1 c buttermilk
  • 1/2 tsp baking soda
  • 1 c cornmeal
  • 1 c gluten free flour 
  • 1/2 tsp xanthan gum
  • 1/2 tsp salt
method:

  1. Preheat oven to 350 degrees F. Grease muffin pan and set aside.
  2. In a microwave safe bowl, melt butter. Stir in sugar.
  3. Add eggs and stir to combine.
  4. Stir in buttermilk.
  5. Add dry ingredients, and stir until few lumps remain.
  6. Scoop into prepared muffin tin. (or pour into greased, preheated cast iron skillet)
  7. Bake for 20 minutes in preheated oven, or until a toothpick inserted into the center comes out clean. (30-40 minutes if using a skillet or baking dish instead of muffin pan)
  8. Allow to cool in pan for 5 minutes before removing to cooling rack. Best served warm.
chef's notes:

I used my favorite and trusty cast iron skillet in which I put about a tablespoon of beef tallow and put in the oven while it was preheating. It baked for about 35-40 minutes and turned out with a lovely crust, a little brown on top, and ooooh so yummy. The only change I would make is to omit the xanthan gum called for in the recipe because my all purpose flour already contained it. This is one recipe I don't feel the need to tinker with! Although I could see myself adding cheese or chilies or something like that some time, but honestly it's just perfect like it is.


Tuesday, April 2, 2013

Gluten Free Spiced Peach Buckwheat Waffles, Sans Xanthan Gum

Light, fluffy, flavorful and without gluten and xanthan gum!
Our family's favorite waffle recipe
Many gluten free recipes call for xanthan gum...at least the ones that are mimicking their evil gluten-containing twins, like cakes, cookies and breads. Since xanthan gum is derived from corn, that can be an issue for people with corn allergy. I'm considering exploring that possibility here, but just haven't been able to bring myself to that point yet. Going gluten free is challenging as it is, and to eliminate another food that is so helpful in gluten free cooking (cornstarch and tortilla chips!!) is ratcheting it up a notch too high at this moment.

As I rediscovered my love of buckwheat, I began to notice most bread-like things made with it contain xanthan gum. I have a lot on hand, thanks to a friend and a good deal at a local "dented can" grocery store, but if I don't have to use it then I'd rather not. And, since we are Waffle Lovers over here (thanks to my awesome stepson Andrew who got me a waffle maker for a gift) I was trying to find a buckwheat waffle recipe that didn't require the use of xanthan gum.

My mother in law had shared her waffle recipe with me when I got the waffle iron and I thought why not just substitute the all-purpose flour with buckwheat? It has whipped egg whites in it and baking powder so that will make them rise and be fluffy. I tried it and they turned out great, and honestly, I like them better than their evil wheat twins. Like I said, I love buckwheat!

They are a bit more labor intensive since you have to beat the egg whites until moderately stiff, but that only takes a minute or two, and the result is amazing so it's worth it. I also add vanilla, because we love vanilla too, and the aroma while they are cooking is amazing. We also like to have these any time of day, really. I'm planning on experimenting with a "savory" type of waffle for supper time, although we frequently have these waffles and scrambled eggs for "brupper". Breakfast for supper...

Best Ever Waffles (foodnetwork.com)

Ingredients:
  • 1 1/3 c buckwheat flour (any type)
  • 4 tsp baking powder
  • 1/2 tsp salt
  • 2 tsp sucanat (or sugar of your choice)
  • 2 eggs, separated
  • 1/2 c melted butter, coconut oil or olive oil
  • 1 3/4 c milk
  • 2 tsp vanilla, more or less (;
Method:

Plug in your waffle iron to preheat it. Whisk together dry ingredients in a mixing bowl. Whisk together egg yolks, milk and vanilla. Beat egg whites until moderately stiff. Combine milk mixture and flour mixture and blend well (I just use a whisk), mix in melted butter, then fold in egg whites. Cook on well greased waffle iron until done, top as desired. 

We usually use butter and real, yummy maple syrup. We also like fresh blueberries and whipped cream...well, any kind of fruit and whipped cream. Today, I made spiced peaches to put on top, which would have been good with whipped cream...had I thought of it in time to make the whipped cream. I'm not a morning person. I'm also not a DST person. The combination has been especially brutal this year. 

Anyway...the "spiced peaches" was not made as ideally as I'd prefer (fresh peaches and juice) but I do the best I can with what I have. Here's my "recipe"....

Spiced Peaches and Syrup

Ingredients:
  • 1 large can sliced peaches in heavy syrup
  • 1/2 tsp cinnamon
  • 1/2 tsp ginger
  • 1/4 tsp nutmeg
  • 1/4 tsp cloves
  • splash of vanilla
Method:

Drain some of the heavy syrup off the peaches and whisk in the spices until well combined. Add the rest of the peaches and juice and mix well. 

If I had fresh peaches, I would have sliced them and put a little sugar on them to draw out the juice, then proceeded as above. Makes my mouth water to think about it...I absolutely ADORE fresh peaches.
Lightly spiced, no HFCS. Delicious on our waffles!


Sunday, March 31, 2013

Allergy-Free* Spice Cake...FINALLY!

Thankfully, we don't have nut or egg allergies here, but I know many do so I'm sharing this recipe I found...and modified to suit our gluten-free needs. We love spice cake, and cake in general, so it's great to be able to have our cake and eat it too even though we're gluten-free. I made this for a family gathering today, and eaters of gluten loved it too.

I found this recipe on All Recipes, it's called Wacky Buckwheat Spice Cake. It's egg and nut free, and with some small modifications also gluten free. The title to my post is Allergy-Free*...but if you have a corn allergy you'll need to substitute for the cornstarch. I know there are people out there that are allergic to virtually everything, but I think this seems like a recipe that would suit many with egg, wheat, gluten and nut allergies. I was so happy to find this, because all the recipes I'd found for buckwheat cake always included almond meal...which I never have because it's kind of pricey. I'd wondered if ground flax would be a suitable substitute and decided that a family gathering was the perfect place to test out a new recipe.

The batter is thin, and seems like it would be too runny but it bakes up nicely. It fills the house with a delicious spicy aroma. And it tastes fantastic. The texture is different than regular spice cake, ground flax is not as fine as regular flour. It also calls for a couple pinches of black pepper, which did not sound good at all to me so I left it out. I topped it off with a creamy cream cheese frosting (add a couple spoonfuls of sour cream and wow is it yummy!), but it would be good by itself or topped with fresh whipped cream or a sprinkle of vanilla sugar, maybe even some fruit. 

I doubled the original recipe and baked it in a 9" x 13" pan. Click on the link to go to the original recipe, what follows is how I made it...


Ingredients:
  • 1 cup flax meal
  • 1 cup buckwheat flour
  • 1 cup cornstarch
  • 1/2 cup sucanat
  • 1 cup white sugar (next time I will use all sucanat)
  • 2 teaspoons baking soda
  • 1 tsp salt
  • 2 1/2 tsp cinnamon
  • 1 tsp ground ginger
  • 1 tsp allspice
  • 1/4 tsp dry mustard
  • 2 Tb molasses
  • 1/2 cup light olive oil
  • 2 Tb white vinegar
  • 2 tsp vanilla
  • 2 cups cold water
Method:

Preheat oven to 350 degrees. Whisk together the dry ingredients in a large mixing bowl.

In a separate bowl, combine wet ingredients. Make a well in the center of the dry mixture and pour the wet ingredients into the well. Mix until just blended. Pour the batter into a 9" x 13" baking dish (the original recipe says ungreased, but I missed that and greased the pan with no ill effects). 

Bake in the preheated oven until it passes the toothpick test, 30-40 minutes. Cool completely before frosting.


Tuesday, October 30, 2012

BREAD! BROWNIES! Oh My...

One of the things that I mourned at the thought of HAVING to be gluten free (instead of just choosing...very different, you see...) was bread. There is nothing so comforting as the smell of a delicious, yeasty wheat bread baking in the oven and filling the house with wheaty, carbolicious joy. And, God has given me a gift with bread making...I can usually turn out a pretty mean loaf. Then there's cookies, pies, biscuits...sigh...

Of course, I have been searching online for easy, tasty GF recipes and the two I tried today did not disappoint. In fact, I was quite impressed with the GF Sandwich Bread from Serious Eats. Seriously. I read through all the comments and the only changes I made were adding a tablespoon of honey (there is no sugar in the recipe, and someone suggested it to make the gf-ness less obvious, especially for someone new to GF eating) and I used whole milk...not a big fan of powdered milk here. I used 1 cup of water and 3/4 cup whole milk. Be sure to read through the directions and comments before making this, if this is the first time you've tried a GF bread. There is a lot of great information there regarding GF baking. I half expected it to flop, since I don't really know what I'm doing when it comes to using GF flours, but it was definitely a success and a keeper as far as I'm concerned!

The taste and texture are slightly different than wheat bread, but not in an offensive way. Sister LOVES it, so you know it's good. Mister likes it too (and so does the dog...he dropped a chunk on the floor).  I'm happy that tomorrow, we can have sandwiches for lunch!  Doesn't it look delicious? It looks like real bread!


We were having my mom over this afternoon, and company for dinner so I decided we needed some brownies. I found a great recipe for Gluten, Casein and Soy Free Brownies at the Bob's Red Mill website. I didn't have unsweetened chocolate, so I used the old stand-by substitute of 3 Tbs cocoa and 1 Tbs oil (coconut) and they turned out great! I prefer a fudgey brownie over a cakey one, and this one was nice and fudgey.  The Teenager asked if I made them differently and when I told him I used a gluten free flour he didn't like them. Oh well, his loss...and more for the rest of us! This made a 9 x 13" pan and I cut it into 20-24 brownies, I should have counted but didn't, and only four were left when I cleaned up from supper.  Really now, do you think you could pass these up?


My daughter said today "Well, maybe this gluten free thing won't be so bad after all." Yeah, I think she's right. I don't know why I had my knickers in a bunch now...


Monday, October 29, 2012

Our Gluten-Free Table Today

I have to admit I have not planned well for meals this week...I've gotten lazy over the last several days weeks months to be honest. And I surely wasn't prepared for planning gluten-free meals! What a blessing kind and generous friends are, let me tell you. Each day, I'm kind of "flying by the seat of my pants" and trying to pray about what to make, but it is so easy to just slip into "well, what sounds  good right now?" (along with the new "and how do I substitute the gluten ingredients in it?"). It's a process. 

Today, I am quite certain gluten should not be a part of my diet, and my son's for sure, and most likely my daughter's. I accidentally consumed something with gluten in it last night and I have felt terrible all day...the same way I felt after absentmindedly eating Hidden Valley Ranch - tired and hung-over-ish, no motivation aside from a strong desire to crawl back into bed and sleep. Blech. I don't think there's much gluten-containing foods worth feeling like that. Well, except for cheesecake, maybe. And my mom's Old Fashioned Cream Pie....

Other clues are that my son was, although active and boyish, not "spastic" and driving me out of my gourd all day. His BM today looked more like a normal one, his face looks less bumpy. And, for my daughter, the doctor's office called and said her TSH test was a little elevated and they want to recheck in eight weeks. I so want to save her from ending up like me so if her diet is contributing to the elevated TSH, tiredness, brain fog, etc. then I want to fix it now while she is young! I also need to really watch for soy, although we don't eat as much soy as we used to. Just something else I need to be vigilant in watching for when reading labels.

We ate fairly well today, I think:

  • Breakfast was scrambled eggs and fresh apple slices. I like sharp cheddar melted on top and smothered in homemade salsa and sour cream (the eggs, of course!)
  • Lunch was Millet Meatballs in Quinoa Rotini Pasta and homemade spaghetti sauce, sprinkled with freshly grated parmesan cheese and a side of fresh veggies. Very tasty! I was a little unsure if I'd like the Qunioa/corn pasta, but it was practically like "real" pasta. I love that it is made with Quinoa!
  • Supper is in the oven right now:  A hybrid Tater Tot Casserole. I quit buying canned soups ages ago, so it was a cornstarch-thickened gravy made with beef broth, sour cream  and nutritional yeast, browned ground beef, and green beans.  I am not sure if Tater Tots are safe yet (and I don't have any in the house, anyway), so I made mashed potatoes to put on top. All in one lovely, cast iron skillet too. Love those one-dish meals!
Here's how I made the Millet Meatballs (I just threw it together, so measurements are not guaranteed to be accurate!)

Millet Meatballs

ingredients:
  • one free range egg
  • 1/4-1/3 cup of leftover cooked, seasoned millet
  • 1/4 pound or so of ground beef
  • Miss Tink's House Seasoning
  • 1-2 Tbs nutritional yeast
  • 1-2 Tbs olive oil or fat of choice
method:
Whisk together egg, Miss Tink's, and nutritional yeast. Add millet and mix well, then add ground beef and mix very well. Form into meatballs. Gently heat olive oil in a cast iron skillet and brown meatballs on all sides until cooked through, or brown all sides then finish cooking in a 350 degree oven until cooked through, about 20 minutes. These can be seasoned however you like, of course...more garlic, some spicy hot pepper, even add shredded vegetables like carrot or zucchini. The kids and I loved them and there were none left over! I forgot to count how many it made, but my best guess is about 15 walnut-sized meatballs.
________________

I can't think of anything to go with our supper tonight, and honestly don't really care to make anything else. I just want to get done with the day and crawl into bed, into my nice, fragrant, freshly laundered flannel sheeties. I just love Fall!

Good Gluten-Free Eats to you!

Wednesday, August 3, 2011

Apple Pie-itas

Do you ever just throw something together really quickly and it turns out amazingly yummy? I love it when that happens! Look what I did with a few simple ingredients today to satisfy my sweet tooth…

I’m really trying to cut sugar out of my diet. But, it’s really, really hard. Today, I had a really bad craving for something sweet and fortunately (or unfortunately, depending on how you look at it) I didn’t have any junky sweets laying around. We very rarely do, although on occasion I do buy my hubby cookies or there is leftover birthday cake.

My daughter had just made a quesadilla for lunch, and I started thinking about those fried cinnamon things from Taco Bell. I don’t really like them…they kind of remind me of pork rinds with cinnamon or maybe what fried paper towels would be like if you sprinkled them with cinnamon and sugar. Gross, either way you look at it.

I got an idea to fry up a tortilla in some butter and sprinkle some cinnamon sugar on top. Impromptu oreja de elefante. Then I got the idea to spread some homemade applesauce on that and drizzled a tiny bit of half n half (I’m unfortunately out of raw cream at the moment or that would have been even better!). I rolled it up and tooka bite and WOW was that good. Really satisfied my sweet tooth!

It could have been healthier…homemade tortilla instead of store-bought, sucanat or raw sugar instead of white, and raw cream instead of pasteurized half n half, but I think it was still infinitely more healthy than an apple pie from Mc Death’s.  Honestly, it kind of tasted like one…but better! I will be making these again with more healthy ingredients next time, but I’m glad I found a way to make something delicious, inexpensive, quick, and with minimal heat added to my kitchen on this hot, sunny day!


100_3430
I quick took a picture before it was gone...click on the picture for an up close and delicious look!


APPLE PIE-ITAS


INGREDIENTS:
  • 1 soft tortilla
  • 1 Tb butter (or other healthy, traditional fat) for frying  I think coconut oil would be awesome!
  • 1 tsp (more or less to taste) cinnamon sugar, or combine your favorite sugar and cinnamon
  • 1-2 Tbs unsweetened or lightly sweetened applesauce
  • drizzle of raw cream
  • a bit more cinnamon sugar to sprinkle on top, if desired
Makes 1 serving


METHOD:

Melt fat in cast iron skillet, add tortilla and coat well in melted fat. Flip over to coat other side, then fry each side until slightly crispy (you need to be able to roll it up). Remove from pan, sprinkle with cinnamon sugar. Spread applesauce on top, drizzle with cream and stir it around a bit until combined. Roll tortilla, sprinkle with more cinnamon sugar, if desired. Eat. Would also be good topped with fresh raw whipped cream, raw vanilla ice cream, yogurt or kefir!

Wednesday, July 6, 2011

What’s For Supper Wednesday: Tostadas de Alba

tostadas de alba
Quick, tasty and fresh...just what I love in meal!
Click on the picture for a closer look
In an effort to be more consistent with my blogging, I’m going to try to post on Wednesdays what we’re having for supper.  PLEASE feel free to leave a comment and share what you’re eating too! I love to see what other people are cooking!

And so, for the very first What’s For Supper Wednesday post, I’ll share the Mexican-y thing I whipped up that got an enthusiastic thumbs up from my toughest critic…My Husband...

I wasn’t sure what to call this dish…I guess they’re Tostadas, so for  the lack of a better name, I’ll call them Tostadas de Alba…which is a very loose translation of my first name. I love artistic license…

Supper needed to be quick and easy, and what can be easier than tortillas with something on them? I fried some ground beef and lightly seasoned it with a different blend of spices than what I usually use ( a homemade taco seasoning), which was what the Husband liked. He said he likes taco seasoning, but then ends up burping it all night. Come to think of it, so do I…and I unfortunately remember a bad night after eating too much taco salad while I was pregnant with my son. I didn’t eat anything Mexican for a long time after that. 

The tortillas were fried crispy in butter, topped with refried beans, meat, sharp cheddar cheese (if only I had some queso blanco….) and pico de gallo. The result was absolutely delicious! I just threw this together, so measurements are approximate…and feel free to substitute peppers…we’re not a spicy kind of family so it’s very mild, but I think I would have actually liked a bit more kick. My tastebuds are getting wild in their old age…

TOSTADAS DE ALBA
INGREDIENTS:
1/2 lb ground beef
1/2 tsp ground coriander
1/2 tsp paprika
generous shake or two of Miss Tink’s House Seasoning
salt, as desired
refried beans of your choice
flour tortillas
butter or other traditional fat for frying
shredded cheese 
PICO DE GALLO INGREDIENTS:
I made this with what I had on hand so it’s not necessarily “authentic.” It sure was tasty though!
1 roma tomato, diced
1/4 cup onion, diced
1/4 c green pepper, diced
1-2 tbs hot yellow pepper, minced
1 tbs fresh lime juice
1/8 tsp ground coriander
salt to taste
METHOD:
Make the pico de gallo first so the flavors can blend nicely while you’re cooking the rest of the dish. Combine the vegetables, lime juice and seasonings and set aside.
Brown ground beef, season with Miss Tink’s while cooking. When cooked, add coriander, paprika and more salt/Miss Tink’s as desired.
Heat refried beans. Meanwhile, melt butter or other fat in skillet and fry tortillas on both sides until crispy. Layer beans, meat, and cheese, waiting a bit for the cheese to melt slightly before topping with pico de gallo. Makes about 3 to 5 tostadas, depending on how generously you top them.
CHEF’S NOTES:
This was super easy to make and really tasted good! I would have preferred to use fresh cilantro, however I didn’t have any on hand…and the Husband doesn’t like as much cilantro as I do anyway. The hot yellow pepper I used wasn’t very hot at all, so if you like spicy, adjust accordingly. It also would have been good with some Mexican crema, sour cream, or homemade ranch dressing…but it was still delicious without it! The different seasoning on the meat was a delightful change from the plain old taco seasoning I usually use. I will definitely be making this again.

Thursday, April 14, 2011

Blueberry Bliss: Whole Wheat Pancakes with Blueberry Compote

ww pancakes w blueberry compote I woke up  wanting pancakes, and after perusing my latest copy of Woman’s Day this morning, I had a plan – pancakes with blueberry compote (pg 182 of the May 2011 issue or you can click here for a slide show presentation of the article “How to Make Pancakes”).  Of course, since I’ve basically eschewed White Death Flour, I make 100% whole wheat pancakes now. I decided to look for a new recipe since I’d just been adapting my normal pancake recipe by substituting whole wheat flour. I found this delicious recipe at AllRecipes.com and made a couple adaptations to suit our real-food lifestyle…


I left the blueberries out of the pancakes and made Blueberry Compote instead…recipe follows the pancake recipe

INGREDIENTS:
  • 1 1/4 c whole wheat flour
  • 2 tsp baking powder (aluminum-free)
  • 1 egg (pastured)
  • 1 c milk (raw)(+ up to 1/4 cup more if needed)
  • 1/2 tsp salt (sea)
  • 1 tbs artificial sweetner raw sugar
  • 1 tbs melted coconut oil (no oil called for in original recipe)
  • 1/2 c blueberries
METHOD:

Sift together the flour and baking powder (I’m too “efficient” for that…just mix them together well!), set aside. Beat together the egg, milk, salt and sugar in a bowl. Stir in flour until just moistened, add coconut oil and blueberries and stir to incorporate.

Cook pancakes on a hot griddle or cast iron skillet. The most important part of making great pancakes is PATIENCE! You simply MUST wait until it’s the right time to flip them…when the top is bubbly and the edges look dry, then it’s time to flip. It’s hard, I know…I’m still guilty of premature pancake flipping from time to time…I don’t like to wait…

Serve with your favorite pancake toppings…might I suggest:

Organic, pastured butter made from raw cream and this fabulously easy and delicious Blueberry Compote recipe with a drizzle of fresh, raw cream…


The link above will take you to Woman’s Day magazine’s website, where you’ll find a slideshow showing how to make perfect pancakes. This recipe is on step 4 of the slide show, or on pg 182 of the May 2011 issue of Woman’s Day

INGREDIENTS:
  • 2 c frozen (or ideally, fresh organic) blueberries
  • 2 tsp fresh lemon juice
  • 2 tbs raw sugar (I actually used less and it was still delicious…adjust for your taste)
METHOD:

In a small saucepan, combine all ingredients and simmer, stirring occasionally, until slightly thickened and syrupy, 5 to 6 minutes

wwpancakes eaten
Bon appetit!

Monday, March 14, 2011

Crockpot Love: Mexicali Chicken and Cheese Sandwiches

The switch to DST (Dumb Stupid Time in my book) always leaves me off-kilter for basically the entire 8 months of this ridiculous practice. So, my crockpot and I continue our love affair…only changing things up a bit from chili, soups and stews. Tonight, it’s an adaptation of a recipe I found on Food.com called by the same name…Mexicali Chicken and Cheese Sandwiches. My DST stupor has left me too uninspired to change the name…really, I’m just happy I got it in the crockpot in time to be done for supper…

MEXICALI CHICKEN AND CHEESE SANDWICHES
INGREDIENTS:
  • 4 Boneless, skinless chicken breasts
  • 1/4 c water
  • several generous shakes of your favorite pepper sauce, I used LaBelle No. 5 Pepper Clear, a mild sauce with vinegar and garlic
  • appx 1 Tbs Miss Tink’s House Seasoning, more or less to taste
  • 3/4 c home-canned salsa
  • 1/4 c no HFCS ketchup
  • 1/4 c water
  • 3/4 tsp chili powder
  • 1 tsp garlic powder
  • shredded Monterey Jack cheese, or other shredded cheese
  • Hamburger buns or Kaiser rolls
METHOD:
Place chicken breasts, water, and pepper sauce in crockpot. Sprinkle seasoning over chicken. Cook on high for 3-4 hours or low 6-8 hours, or until chicken is cooked through and shreds easily with a fork. Drain liquid and shred chicken, add remaining ingredients except for buns and cheese and cook in crockpot until heated through or cook in a pan on the stove. Put on buns and top with cheese. You can then broil if you like. I don’t know what happened to the broiler innards in our oven so I didn’t broil them. Just let them sit until the cheese melts or pop them in the oven for a few minutes.